 We have created a selection of help videos, that you can browse at https://www.sensoryapphouse.com/picom-help-videos/
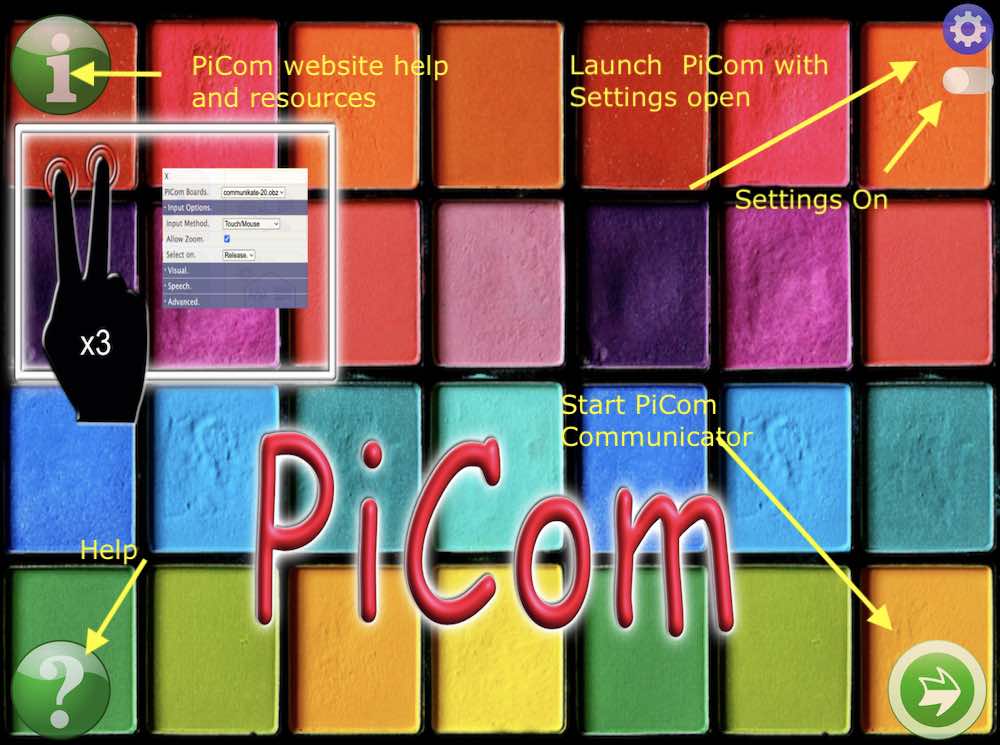
When you launch the PiCom app from your computer or device, the first screen to launch is the PiCom "Home Screen". From here you can launch PiCom full screen, launch PiCom with the Settings screen open (for that session), review the local help file text, open the PiCom resources website (includes detailed help, videos, symbols)
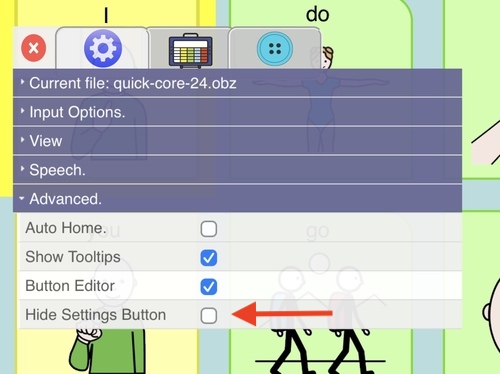
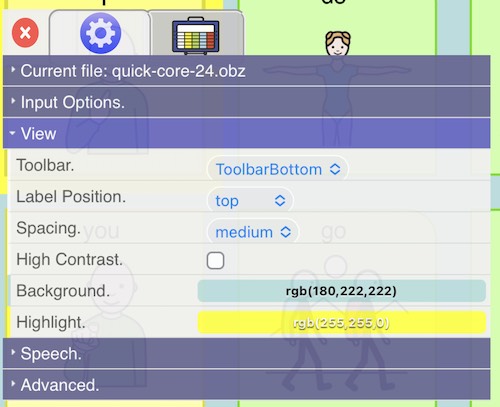
This is an example of the PiCom settings menu. It may differ slightly with version and also on different devices.
Because PiCom is a communicator, we don't show the Settings Button at startup of the app. This reduces the chance of getting into settings configuration mode by mistake. To open the PiCom settings menu there are the following methods:
On all devices, start PiCom, and launch the app by tapping/clicking the Settings Button. This will launch the app with the Settings screens open to allow for configuration. There is a toggle switch that will allow you to ensure the Settings button is always available when you start the app.

- For a device with a mouse, launch PiCom, right click the mouse three times on the top left button of the board
- For a device with a physical keyboard, press Shift Key + S
- For a touch screen device, do a two finger tap, 3 times, at the top left button of the board.
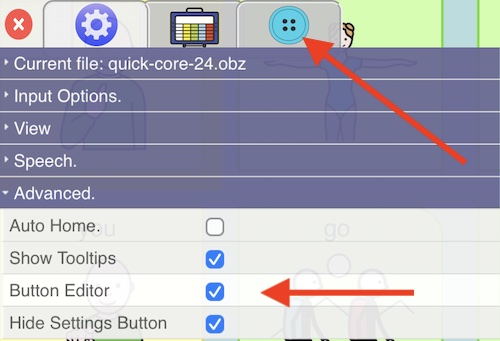
To hide the Settings icon, choose the main settings menu, Advanced, and tick the "Hide Settings Button" as shown above.
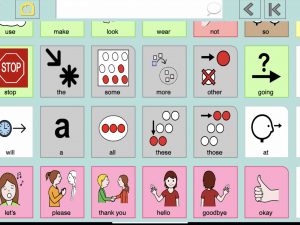
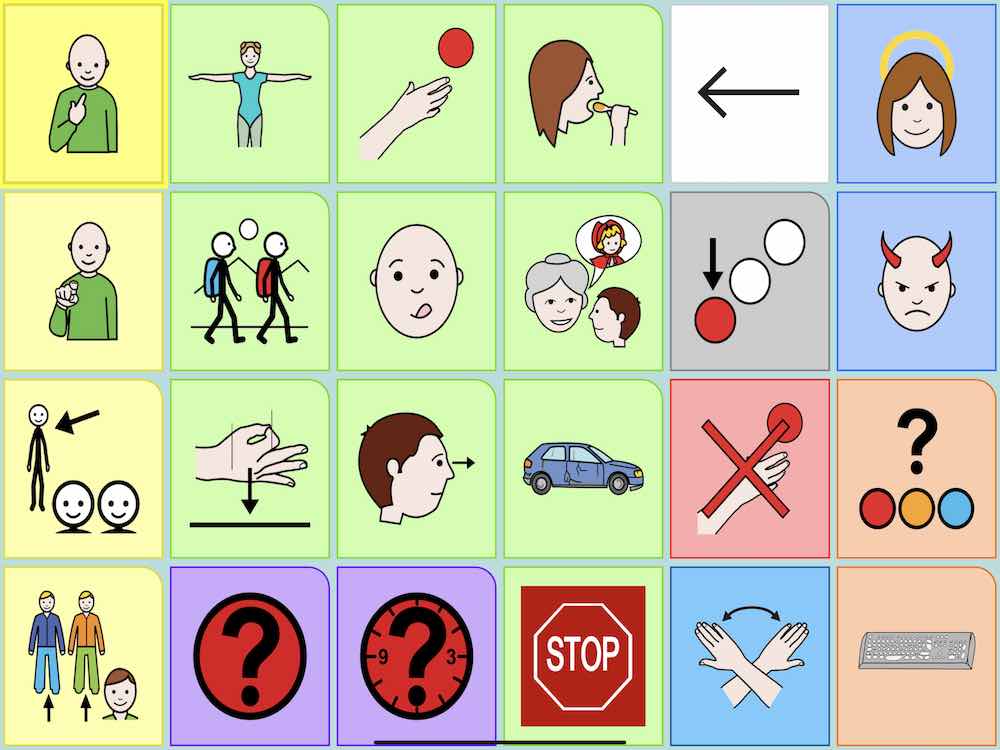
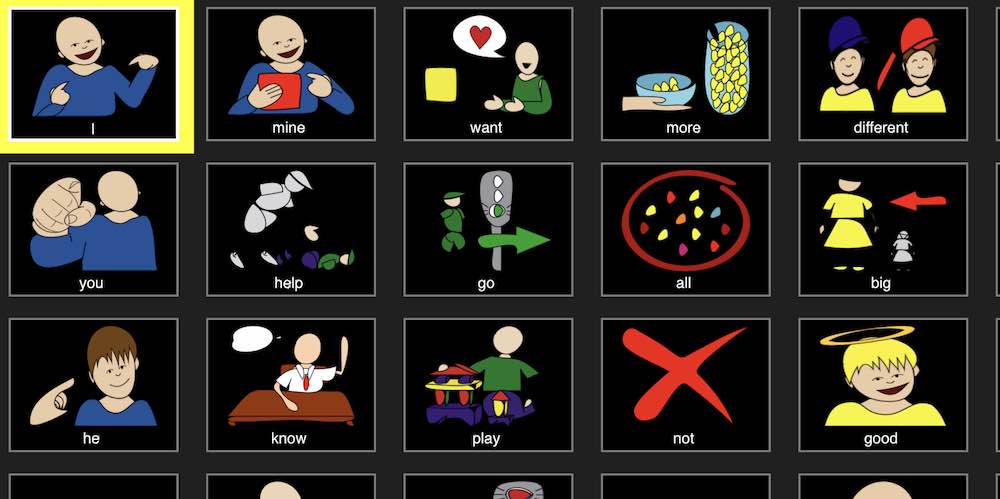
PiCom is design to open and create Communicator Boards using the Open Board Format (.obf and .obz). You can read more about the history and purposes of Open Board format at Open Board Format website
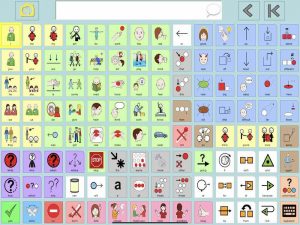
We include in PiCom a range of existing published Communicators and Communicator Boards from the Open Board format community. It is possible within the licenses of the boards we include, for anyone to modify and extend those boards, and use them in any format (print or digital). They can be used on any device software that supports the Open Board format.
Select a board template from the PiCom Boards pull down, as shown below. It is also possible with PiCom to import, export and share boards, covered in another section.
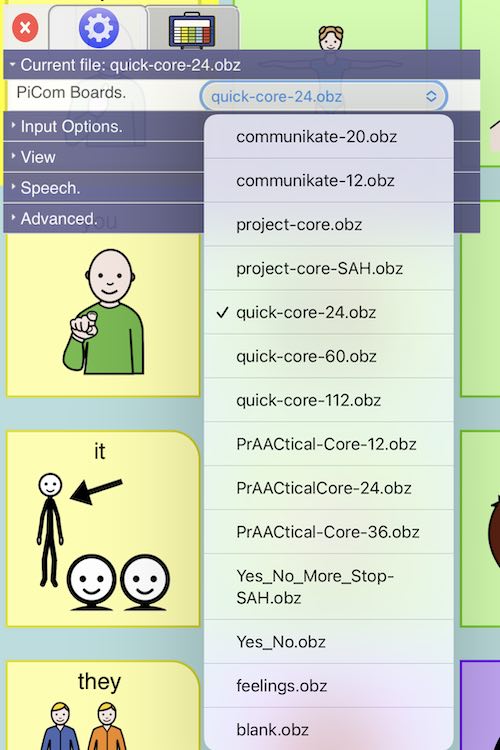
Read more about some of these templates, and any license information at https://www.openboardformat.org/examples
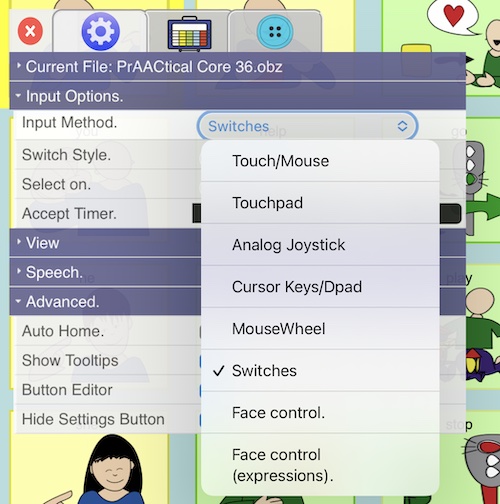
Input Options
Click this option to select how the user can interact with the board.
Touch/Mouse
This allows a user to touch buttons or point and click with a mouse to select buttons. It also allows for pinch and zoom, and to move around the board quickly. See the details for zoom function at the end of this section.
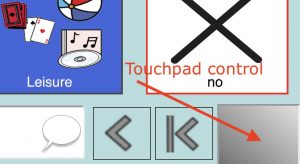
Touchpad
Here we present an onscreen touchpad that can be controlled by touch or mouse. These are provided at both the left and right hand sides of the message bar (which you probably want to set to be at the bottom of the screen – see below). This may be useful for users with a very small range of movement. The touchpad can behave as an “Absolute” map of the board (moving around the touchpad will select different buttons) or as a Joystick (ie. Touching or using a mouse on the 8 outer areas of the “3x3” touchpad will move in the selected direction – the central area is used for “clicking” although you can click with any of the allowed switches – see below.
Analog Joystick
The allows a standard Xbox gamepad/joystick to move around the board. It works very well with the Xbox Adaptive Controller (https://www.xbox.com/en-GB/accessories/controllers/xbox-adaptive-controller).
Cursor keys/Dpad
The cursor keys on a keyboard or the Dpad on a game controller can be used to move around the board.
Mousewheel
Inspired by the jog/scroll wheel on very old Blackberry phones this allows you to move around the screen using a mouse/scroll wheel. Selection can be either using row/column scanning or by stepping through the buttons one by one. Selection is via many of the various methods (see below) but does include clicking the mouse/scroll wheel.
Switches
Allowed switches include mouse buttons, keyboard input (space, return, 1, 2, 3, 4), Xbox controller buttons (switch one is A or joystick press, switch 2 is B). PiCom looks for all of these automatically and so you do not need to select which ones are used. Just ensure the controllers are connected to your device.
Several switch input modes are available:
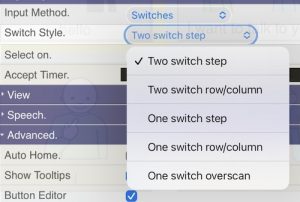
- Two switch step
One switch steps forward a button at a time. The other switch “clicks” the current button.
- Two switch row/column
One switch steps forward by row. The second switch selects the row. The first switch then steps through the buttons on that row. The second switch then “clicks” the current button.
- One switch step
The system automatically steps between buttons (see speed setting below). Pressing the switch “clicks” the current button.
- One switch row/column
PiCom automatically steps between rows (see speed setting below).
Pressing the switch selects the row and then PiCom automatically steps between buttons. Pressing the switch “clicks” the current button.
- One switch overscan
PiCom steps between buttons very fast. The user presses the switch and then PiCom steps backwards between buttons more slowly. Pressing the switch “clicks” the current button.
Appropriate settings will be made available depending on the input mode being used. The full list of input settings is: (only some displayed for each input mode)
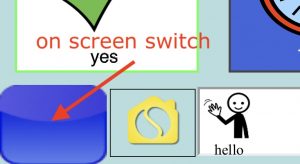
When switch input is selected, PiCom also shows to "on screen" touch switches which can be used to navigate around the boards.
Select on
This allows a selection to be made using either a Press or Release of touch, mouse button, key, or switch. The selection can also be made automatically on a hover, i.e. stay on a button for a given amount of time.
Accept Timer
This allows the setting of how long a switch (including Dpad etc) need to be held down for before it activates.
Hover Timer
This allows the setting of how long a button needs to be dwelled on before a “click” is automatically performed.
Touchpad Size
If the touchpad input mode is selected, this lets you choose the size of the onscreen touchpad.
Speed
How quickly the system will scan or autorepeat – depends on the input method. A setting of 0 (only available for some input methods) disabled autorepeat.
Face (not available on all computers or device)
Some PiCom versions will show "Face Control" and "Face Control (with expressions) as input options. If you select Face Control, then the device will request access to your camera, and a Pointer will appear. The pointer will move as your head moves left/right/up/down. There are options for clicking a button on hover, or with a physical switch. The performance of the Face Control is dependent on a number of factors - the quality of the camera, the setup and processing power of the devices, and other physical factors. Face Control with Expressions mode will respond to Mouth open, smile and eyebrow movement in order to send a select/switch command. This area of technology is constantly developing.
Allow Zoom
The Allow Zoom control is only available for Touch/mouse input. This option allows you to enable/disable whether the page can be zoomed and panned, e.g. via a pinch or two finger scroll to pan on the touch screen. Please not that is zoom is allowed then the toolbar will stay visible (and unzoomed) wherever you are viewing on the board. The zoom option allows for the creation of very large boards, that a user can move around and select from.
The settings here are:
- Toolbar (includes the Messagebar)
The toolbar can be positioned:
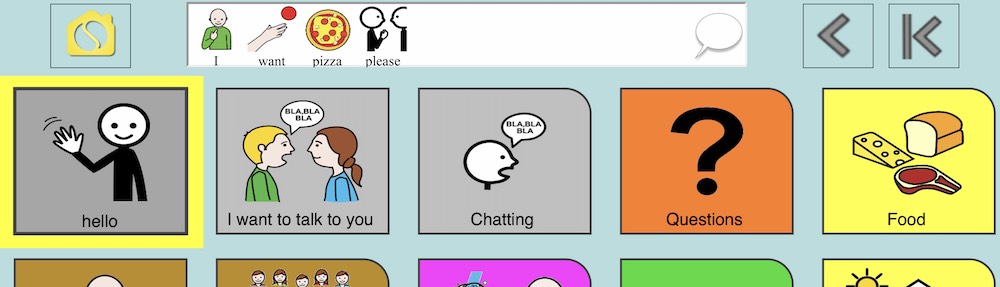
- ToolbarTop
This toolbar contains a home button, a message bar (which can be “clicked” to repeat the current message, a backspace button and a clear button. It is in the “traditional” position at the top of the screen.
- ToolBarBottom
This option contains the same buttons as the Toolbar top option but is placed at the bottom of the screen. Shown on an iPad below.
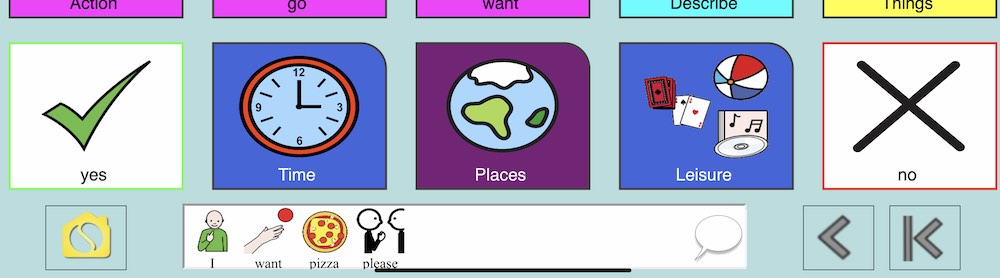
This may be a more convenient position for users who choose the Trackpad option or the Switches option. In these modes on screen Trackpads and Buttons are presented at the left and right hand sides of the toolbar.
- Fullscreen
Here the toolbar is hidden and so there is no message bar.
- Label position
The label for buttons can be place at the top of the button, the bottom, or can be hidden.
- Spacing
This allows you to set how much space is between the buttons, which effectively changes the size of the button images.
- High Contrast
This experimental setting automatically tries to make the board more suitable for some low vision users who may prefer a high contrast display.
- Background
Set the background colour of the board
- Highlight
Set the colour used to highlight buttons and rows
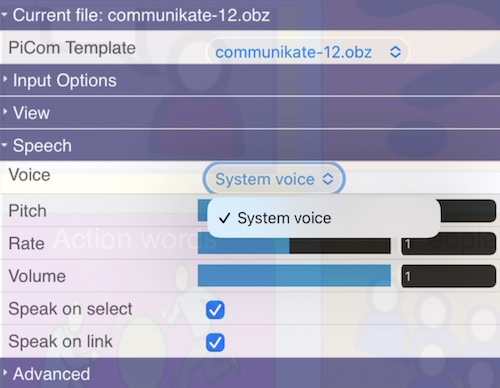
Speech
PiCom lets you select the text to speech synthesiser voice language to use (this may depend on the operating system and device/computer that you are using). You can also choose the pitch, rate and volume of the speech. Generally PiCom will start to use the default selected system voice of the device you are using, so changing the system voice on your computer/device may also apply to PiCom settings, this is device dependent. On iOS, changing the "Spoken Voice" selection in Accessibility settings will change the voice that PiCom uses. This allows you to the large range of voices, accents, languages and voice quality that Apple offer.

You can choose whether the text to speech voice speaks the button content when the button is tapped or selected.
You can choose whether the text to speech voice speaks the button when the button is a link to a new board. So this "announces" the launch of a new board.
With PiCom, you can import boards that are created using the Open Board File formats. These files have a .obz (a collection of boards and symbols) or an .obf file ending (a single board). With PiCom you can use these boards for Communication. You can also modify the boards, and the buttons on the boards, and save then share the new communicators. The second tab of the PiCom Settings is the Communicator Board creation and saving section. This is an example of the Communicator Board Settings tab, with the Red Arrows pointing towards the key functions.
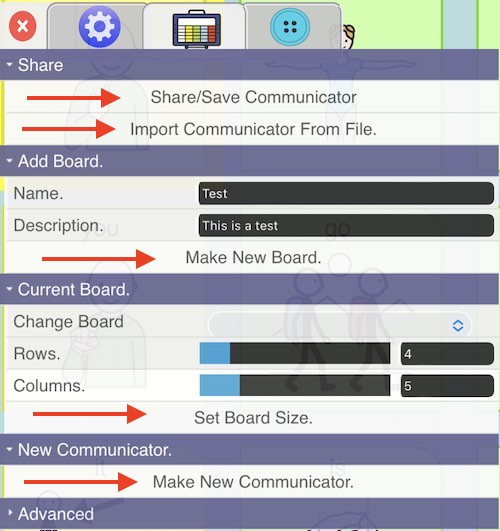 It is possible to import boards, share boards to other devices that have an Open Board format communicator software application. You can make a new board, to eventually add into the existing Communicator template or import that is loaded. You can add rows and columns to any existing board of that communicator. You can make a brand new Communicator from scratch. Once a new Board is created, you can then create a link from an existing board to the new board. Such links are creating using the Button editor (the third tab).
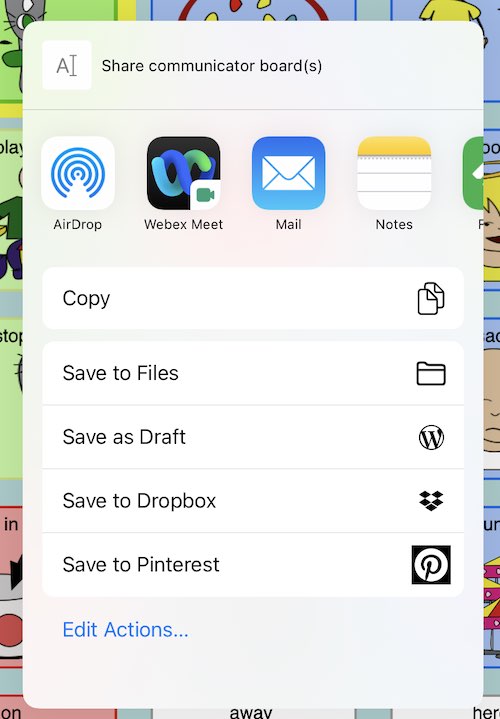
When you want to share or backup/save a Communicator Board set (.obz file) you can select either the Share button or Export button. The screen below shows the iOS Share screen that appears, so you can send a board to a different device, a different person, or save it on the local device files or cloud shared services like DropBox etc. The process is similar on Android, Chrome and Windows devices, but it can look slightly different.
The Button Editor tab is the third PiCom Settings tab. It needs to be turned on to show, and all you to edit and add buttons to a board.
The Button Editor is a powerful tool for modifying existing and adding new buttons, images, symbols, sounds and voicing to a Communicator Board.
The Button Editor is a powerful tool for modifying existing and adding new buttons, images, symbols, sounds and voicing to a Communicator Board.
To modify an existing board, firstly load up the board, containing the buttons that you would like to either edit or create. Then open the PiCom Settings, and switch to the Buttons Settings Editor tab

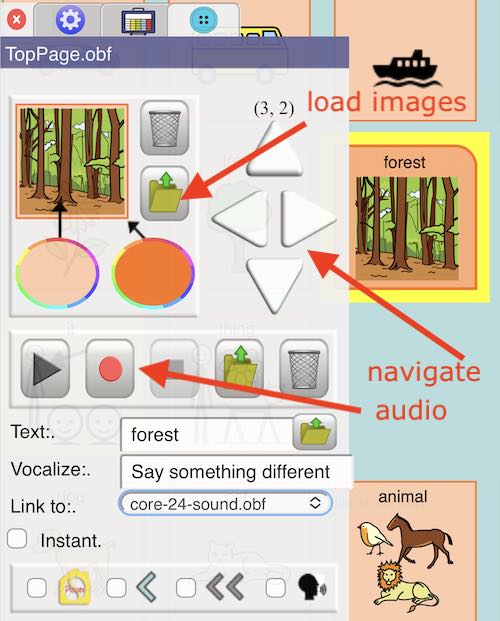
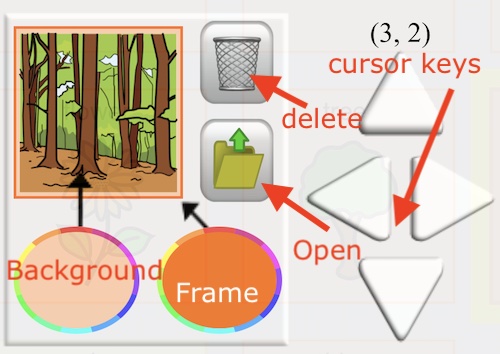
You will find you can move around the Board using the 4 cursor arrows, and the number of the button is shown (e.g. 3,2 will be third column, second row). You may also be able to use the cursor keys of a connected keyboard to move around the board. Once you arrive at the button you want to create or modify, the follow actions are available;
Add an image - you can delete an existing image and add a new symbol, image or photo from the file open menu
Change the background color of the button
Change the button frame highlight color (shows when selected)
If you are creating a new button, and you give the button a text label, a symbol may automatically appear. PiCom contains over 2000 of its own symbols. You also of course add your own photos, that could be more relevant and personal to the PiCom user.
You can also add labels and sounds to any button as follows;
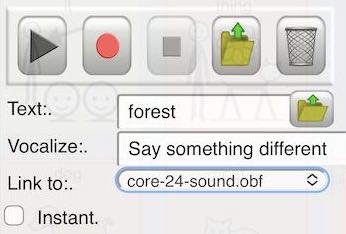
If you want to add a live recorded audio, press the record button, and say the words you would like PiCom to say when the button is pressed. As an alternative you can upload an audio file to play when the button is pressed. If there is an audio file created or added, the text to speech voice will not be used.
You can give the Button a text label. If there is no audio recording, the text to speech voice will speak this label when the button is pressed. If you would like the text to speech voice to say something different to the label, enter that text in the "Vocalize" field, and it will be spoken instead when the button is pressed. You can change the text to speech voices in the main PiCom Settings tab.
The buttons that appear around the PiCom selected text "Message Bar" can be controlled, and appear at the button of the Button Editor Settings.
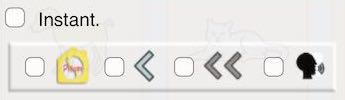
If you tick the "Instant" setting, then once the button is pressed, the voice will speak instantly, rather than placing the text and symbol into the Message Bar field.
If you tick the yellow "home" icon, then the selected Button (when pressed) will return to the "top board". So you can nominate which button can return to the main board. Whilst PiCom has a similar button, the Yellow Home icon to the left of the Message Bar, this isn't available if you are running PiCom in Full Screen View.
It is possible to use any Button to Delete the last word in the Message Bar or to Clear the contents of the Message Bar by ticking the options next to the icons below.

![]()
The "speak message bar" button can be selected, so that the current Button when pressed will read the contents of the whole Message Bar (even if the Message Bar is not in view).
 Sensory Picom is licensed under a Creative Commons Attribution-NonCommercial 4.0 International License.
You are free to:
- Share — copy and redistribute the material in any medium or format
- Adapt — remix, transform, and build upon the material
Under the following terms:
-
Attribution — You must give appropriate credit, provide a link to the license, and indicate if changes were made. You may do so in any reasonable manner, but not in any way that suggests the licensor endorses you or your use.
-
NonCommercial — You may not use the material for commercial purposes.
-
No additional restrictions — You may not apply legal terms or technological measures that legally restrict others from doing anything the license permits.
For Commercial License permission for redistribution, bundling or other projects, please email sales@sensoryapphouse.com with an outline of your query.
If you have obtained your version of PiCom from a commercial app store, there are likely to be other specific license conditions that may apply.
Recent PiCom source code and any underlying licenses can be reviewed at https://github.com/sensoryapphouse/PiCom
From PiCom version 1.0.4 release (April 23), the PiCom user interface can be changed to a wide range of languages. These languages are generated by automatic translation from English to a wide range of languages. We do recognise there could be errors in automatic translations, so would be happy to improve the localisation with co-operation.
You can find the translation pull down in the Board Editor tab (second tab). The full list of languages can be reviewed on this link
![]()
We have also created a routine to produce an automatic translation of the English PiCom templates, so that you can review and edit these in your own language. You can download these Open Boards from our Github site below, and edit as necessary. After downloading a translated communicator board file, use the PiCom Import/Open Board function, edit text and symbols as required, then save the modified board for archive or sharing.

https://github.com/sensoryapphouse/Picom-Board-Translations